IV CANULLA TIPS
Therapy Tips for Starters
Preliminary IV therapy tips and tricks on how to start an IV:
1. Stay focused and be prepared. Hitting the bullseye on one try will depend on the nurse’s preparation and skill. You and your patient should be composed as a nervous and rushed procedure will likely result in failure. Allay anxiety by explaining the procedure to the patient and determine the patient’s history with IV therapy. Ensure the patient is comfortable and sufficiently warm to prevent vasoconstriction.
2. Exude confidence. Believe in yourself and reassure the patient you know what you’re doing. The patient will be encouraged by your confidence and you too, of course.
3. Assess for needle phobia. Needle phobia is a response as a result of previous IV insertions. Symptoms include tachycardia and hypertension before insertion. On insertion bradycardia and a drop in blood pressure occurs with signs and symptoms of pallor, diaphoresis, and syncope. Reassure the patient with a soothing tone, educating the patient, keeping needles out of sight until the last minute before use, and use of topical anesthetics can help manage needle phobia.
4. Observe Infection control measures. Use gloves in inserting a cannula into the patient. Intravenous insertion is an invasive procedure and requires aseptic technique and proper infection control measures. Wipe a cotton swab or alcohol pad on the insertion site to minimize microorganisms in the area and also to visualize the chosen vein more clearly.
5. Assess the vein. Before inserting a needle into a patient’s vein, you have to assess its condition first. A well-hydrated person has firm, supple, and easy-to-reach veins. Well-hydrated veins are bouncy, making them the right fit for insertion. Some patients need intravenous therapy but are dehydrated, so it is a challenge to hit the vein in one go. To avoid injuring the vein, always assess first that you are aiming for a vein that is not frail enough to blow up during the insertion. Take your time. The following tips can help you with that.
6. Feel rather than look. If you can’t see a suitable vein, trust your fingers even more than your eyes. It’s also an excellent opportunity to familiarize yourself with a suitable vein. A tendon may feel like a vein but palpating it through a range of motion may prove that it is not.
7. Ask your patient. The patient may know more which veins are suitable based on his previous IV history.
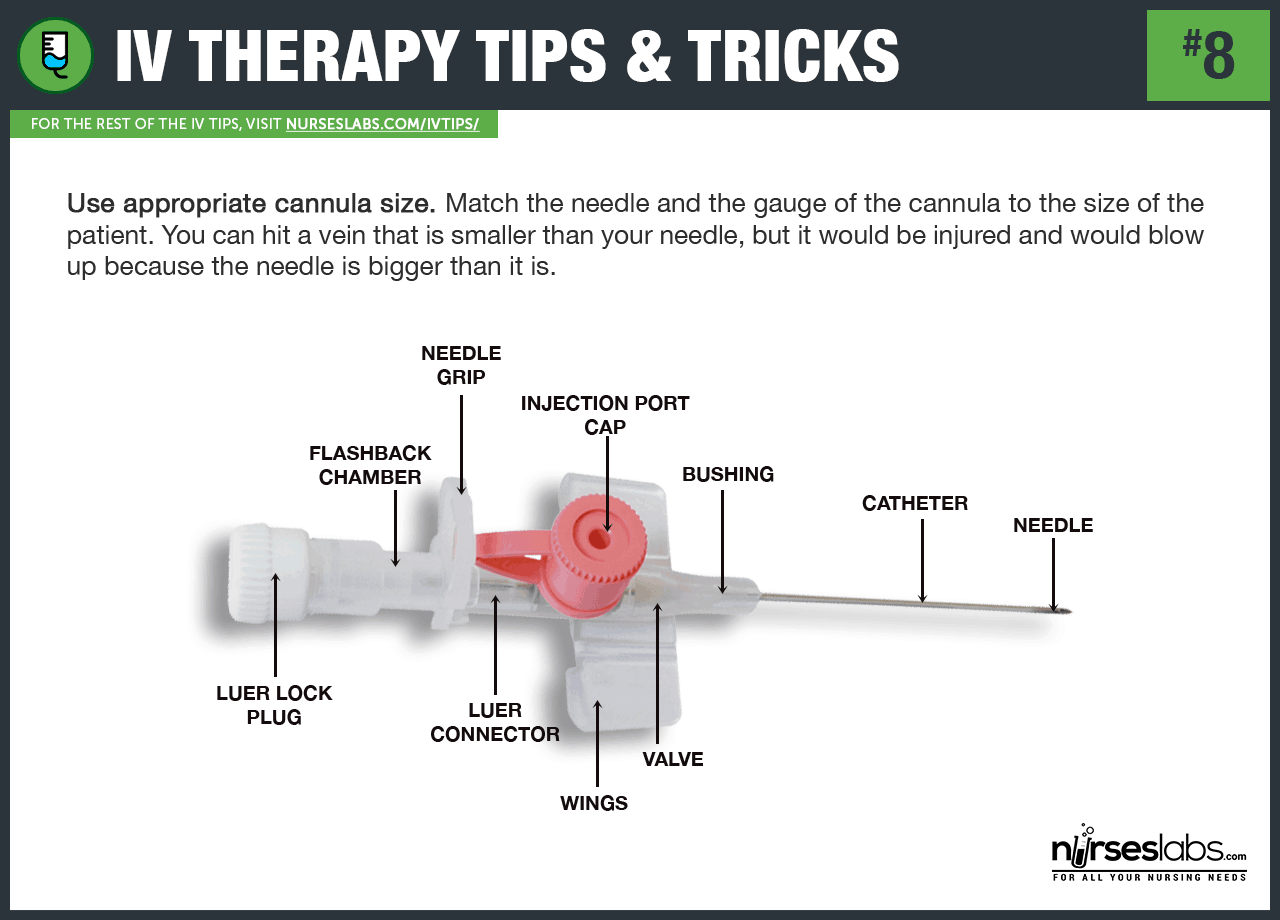
8. Use an appropriate cannula size. Match the needle and the gauge of the cannula to the size of the patient. The gauge refers to the diameter of the lumen of the needle or cannula — the smaller the gauge number, the larger the diameter of the lumen, the larger the gauge number, the smaller the diameter of the lumen. You can hit a vein that is smaller than your needle, but it would be injured and would blow up because the needle is bigger than it is.
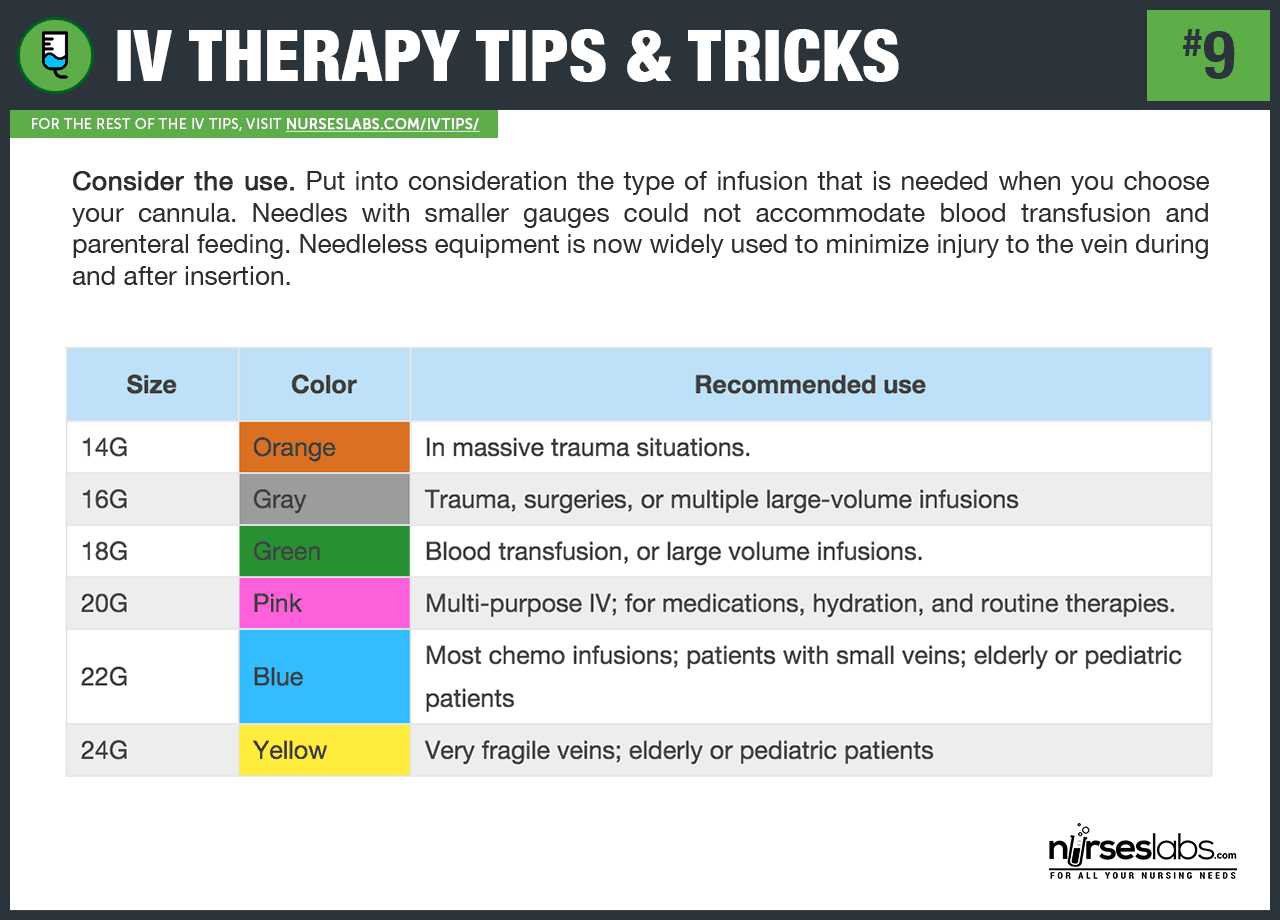
9. Consider the use. Put into consideration the type of infusion that is needed when you choose your cannula. Needles with smaller gauges could not accommodate blood transfusion and parenteral feeding. Large-diameter lumens allow a higher fluid rate than a smaller diameter, allowing the administration of higher concentration of solution or medication. Needleless equipment is now widely used to minimize injury to the vein during and after insertion.
10. Insert at the non-dominant hand first. Consider inserting on non-dominant hand first so the patient can still perform simple functions using the dominant hand. However, if you cannot locate an appropriate site or vein for insertion on the non-dominant hand, proceed with the dominant hand.
Vein Selection for Starting an IV
In this section, the following IV therapy tips and tricks are about selecting the best vein sites for venipuncture.
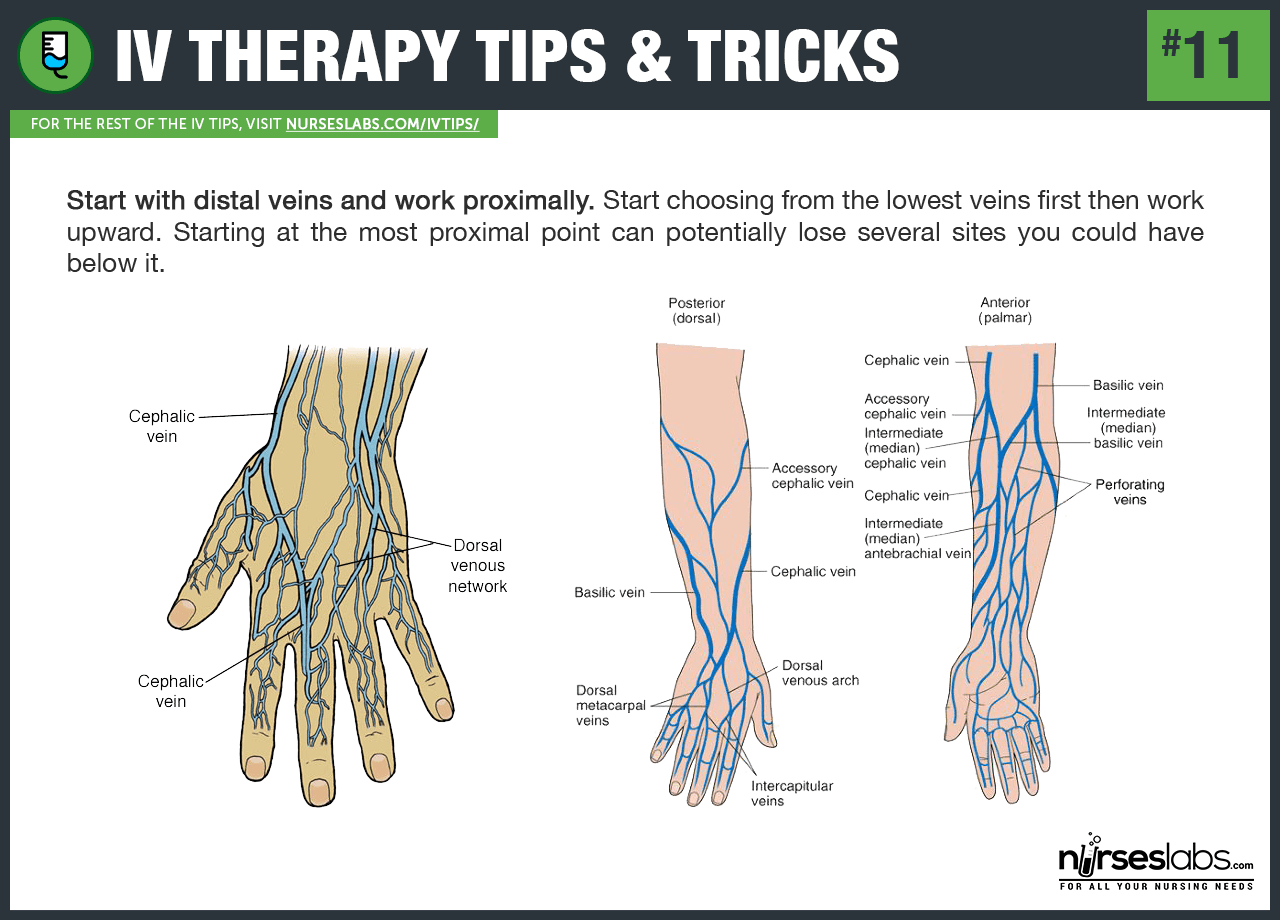
11. Start with distal veins and work proximally. Start choosing from the lowest veins first then work upward. Starting at the most proximal point can potentially lose several sites you could have below it.
12. Use a BP cuff rather than a tourniquet. If the patient has low BP, it would be best to use a BP cuff inflated to appropriate pressure to make the veins dilate. This technique can also be useful for older patients and those with veins that are too difficult to access. For patients with hypovolemia, use a larger vein as small veins collapse quicker. Inflate the cuff to the lowest pressure first and see if the veins appear. When using one as a tourniquet, invert it, so the tubings are away from the limb giving you a clear view of the site and removing possibilities of the tubings contaminating the site. The BP cuff lets your patient have a wider, more comfortable tourniquet that compresses evenly and efficiently and can be adjusted to the exact pressure needed to dilate the veins.
13. Apply the tourniquet correctly. The tourniquet should be placed tightly enough to hinder venous flow, but not too tight to impede arterial flow — that way, blood continuously flows into the extremity, but it meets resistance as it tries to leave, thus distending the veins. Apply the tourniquet snugly, about 20 to 25 cm above the needle insertion site. Feel for the radial pulse with the tourniquet in place, if you can’t palpate it, your tourniquet is too tight.
14. Puncture without a tourniquet. If the patient has adequately filled but fragile veins, proceed with the insertion without using a tourniquet. Pressure from the placement of the tourniquet may cause the client’s delicate vein to blow out upon puncture.
Making the Vein More Visible
Now that vein selection is complete, the following tips and tricks for starting an IV are on how to make the vein more visible.
15. Gravity is your friend. Let the patient’s arm dangle down on the side of the bed if no veins are observed to promote venous filling. Gravity slows venous return and distends the veins. Full and distended veins are easier to palpate and are always an excellent option for insertion.
16. Use warm compress. Apply warm, moist compress or warm towels over the area for several minutes before you insert and, of course, before you cleanse. Leave the compress in place for 10 to 20 minutes. A warmer temperature would enable the vein to dilate and make it more visible to the surface.
17. Do not slap the vein. Some nurses have a bad habit of slapping the site of insertion so that the vein be more visible. Though the practice is helpful at times, veins have nerve endings that react to painful stimuli causing them to contract, therefore, making it harder to locate the vein. Please don’t make an already painful procedure even more painful.
18. Flick or tap the vein. Rather than slapping, use your thumb and second finger to flick the vein; this releases histamines beneath the skin and causes vein dilation.
19. Feel the vein. Wrap a tourniquet above the site of insertion to dilate the veins and gently palpate the vein by pressing it up and down. Use the same fingers in palpation so you would be able to familiarize the feeling of a bouncy vein. Tap the vein gently; do not slap it to avoid contraction of the vein.
20. Fist clenching. Instruct the patient to clench and unclench his or her fist to compress distal veins and distend them; this helps in the venous filling.
21. Use the multiple-tourniquet technique. By using two or three latex tourniquets, apply one high on the arm and leave for 2 minutes, apply the second at mid-arm below antecubital fossa. Collateral veins should appear. Use the third one if needed.
22. Vein dilation using nitroglycerine. To help dilate a small vein, apply nitroglycerine ointment to the site for one to two minutes. Remove the ointment as you make your final disinfection of the site with alcohol.
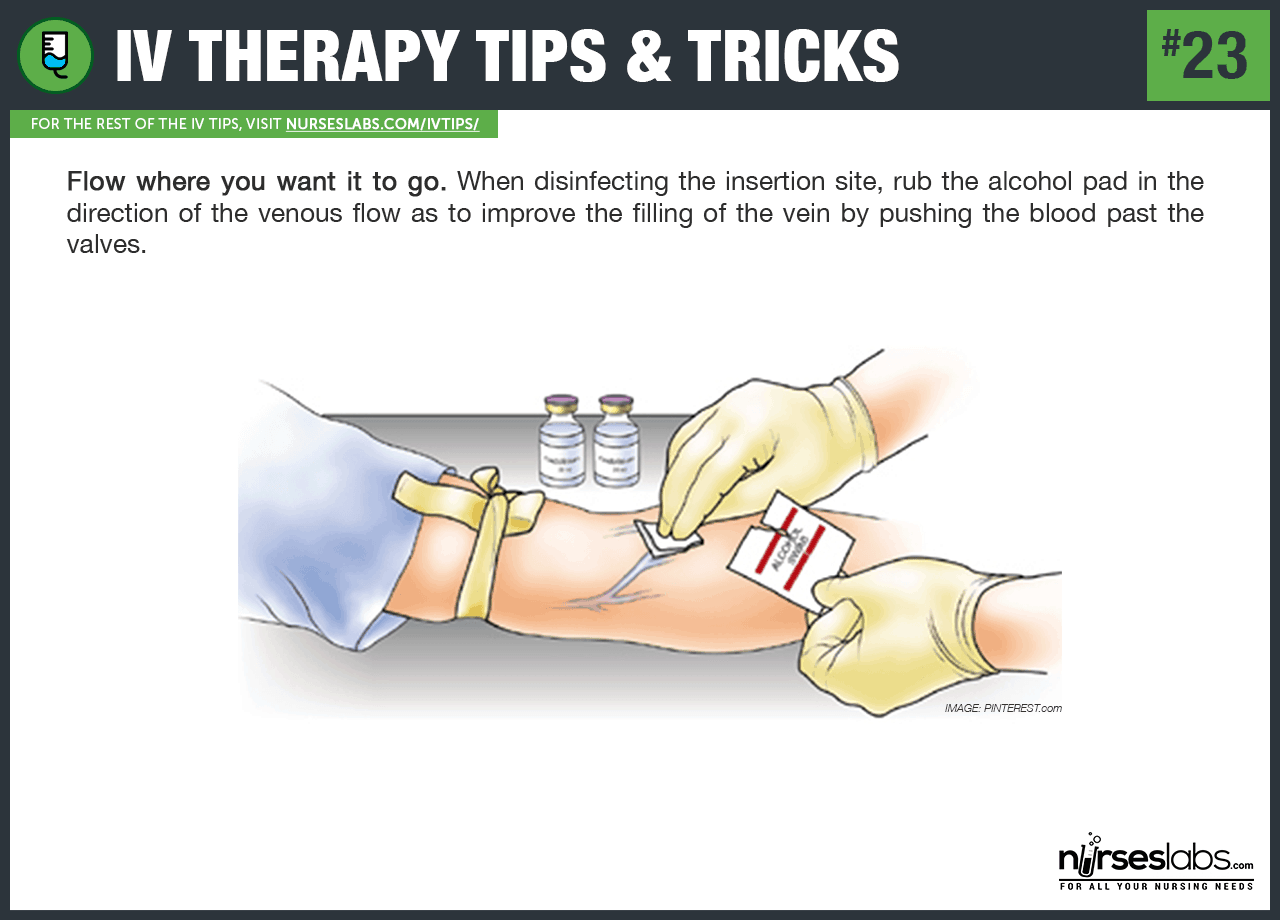
23. Flow where you want it to go. When disinfecting the insertion site, rub the alcohol pad in the direction of the venous flow as to improve the filling of the vein by pushing the blood past the valves.
24. Clean vigorously and widely. To have the tape and dressing adhere tightly to clean dry skin. Disinfect a wider area to in case another vein shows up.
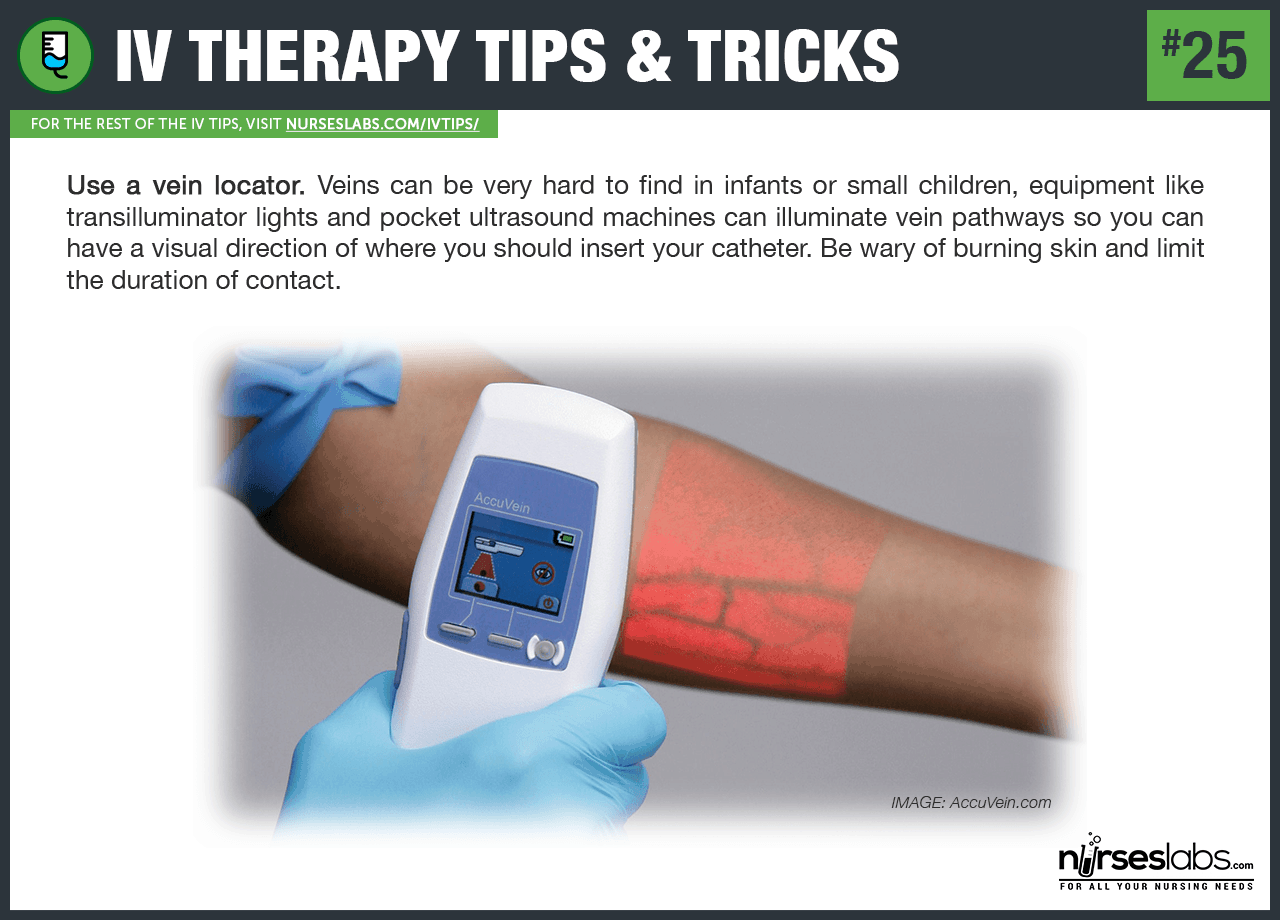
25. Use a vein locator. Veins can be very hard to find in infants or small children, equipment like transilluminator lights and pocket ultrasound machines can illuminate vein pathways so you can have a visual direction of where you should insert your catheter. Be wary of burning skin and limit the duration of contact.
Insertion of the Intravenous (IV) Catheter
For the following IV start tips, you’ll need to give your full attention as this section of the guide is about how to insert the catheter correctly and troubleshooting techniques if you fail to hit it the first time.
26. Stabilize the vein. Pull the skin taut just below the entry site to support the vein for needle entry and this also lessens the pain the patient may feel upon insertion. Make sure that the alcohol has already dried on the skin before inserting because this may become more painful for the patient.
27. Insert the IV catheter directly atop the vein. Initiating venipuncture from the side of the vein can push it sideways even if it’s anchored by your hand.
28. Prevent kinking. Sometimes, if the vein is hardened or scarred, there is a risk of kinking the cannula. Otherwise, one can get through the scar to a usable portion of the vein by using the following technique:
29. Twirl the catheter hub. Mild obstructions, tortuosity of the vessel, vessel fragility, and frictional resistance can be overcome by “twirling” the catheter hub. To do this insert the IV with a slight rotating motion to help glide over some parts of the vein.
30. Bevel up. Make sure the bevel of the needle faces upwards as this is the sharpest part of the needle. Believe me; the needle will glide easily if inserted this way.
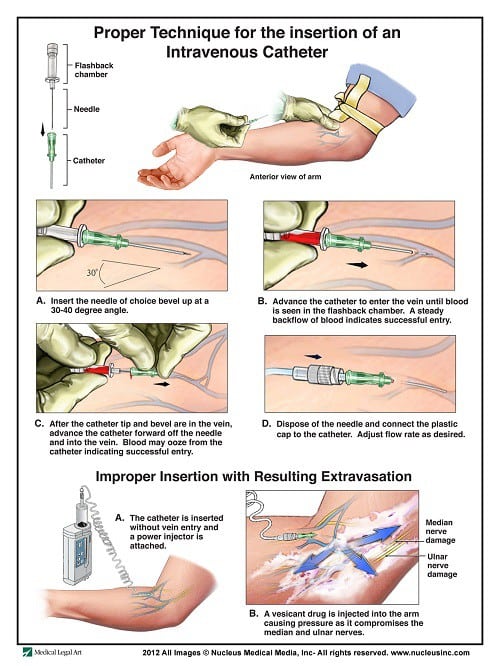
31. Make the shot at a 15-30 degree angle over the skin. Hold the catheter in a 15-30 degree angle over the skin with the bevel up and inform the patient that you are going to insert the needle.
32. Feel for any resistance. As you insert the needle, feel any resistance from the pain. If no resistance is felt, advance the needle carefully. If there is resistance felt, discontinue your insertion because you might disrupt the vein and injure it further.
33. “The Flashback.” Once you can see that there is a backflow of blood (i.e., “Flashback”) from the veins, remove the tourniquet and completely advance the catheter and remove the needle altogether. Secure the catheter to the patient’s skin correctly and open the infusion line to start the therapy. It’s one of the best feelings in nursing!
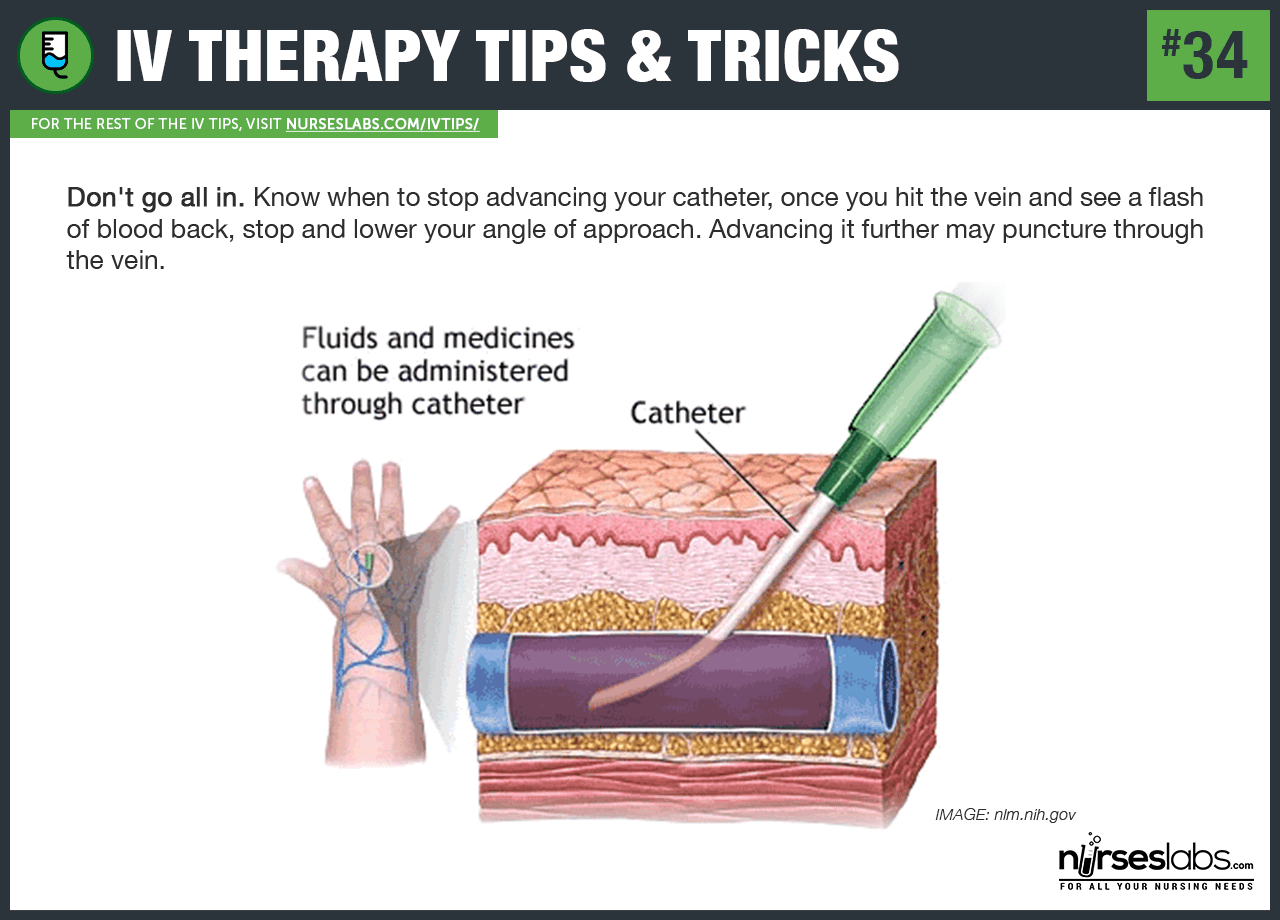
34. Don’t go all in. Know when to stop advancing your catheter, once you hit the vein and see a flash of blood back, stop and lower your angle of approach. Advancing it further may puncture through the vein!
35. Don’t rush into starting the IV fluid. Once inserted and secured, initiate the IV infusion slowly as if you’re working with fragile veins. Rushing to start the fluid might blow the vein.
36. Release the tourniquet first. Once you have ensured the catheter is within the vein, untie the tourniquet before advancing the catheter to prevent it from blowing due to increase in pressure.
Securing the IV Line
If you have successfully inserted the catheter using the IV therapy tips above, you need to make sure it lasts by securing it, here are the tips:
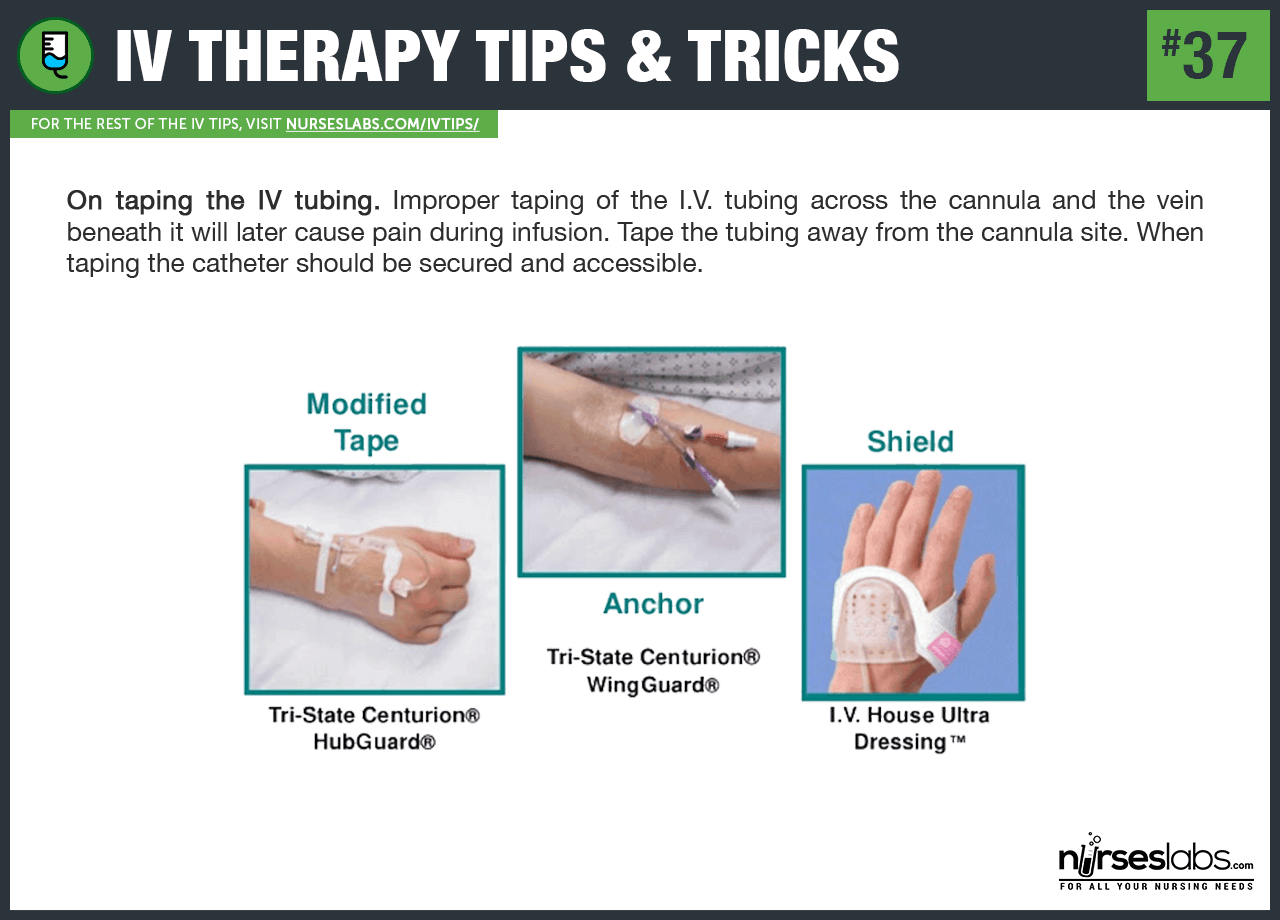
37. On taping the IV tubing. Improper taping of the I.V. tubing across the cannula and the vein beneath it will later cause pain during infusion. Tape the tubing away from the cannula site. When taping the catheter should be secured and accessible.
38. Limbs in motion? When the patient’s limbs are on the move (i.e., inside an ambulance), secure the IV site by locking the arm in extension and blocking the flexion at the elbow.
39. Go with the flow when taping. Tape down the tubing while considering the natural movements of the body; thus running all tubing laterally on the limb in the direction of the motion. You can prevent the tubing from coiling or tangling by “going with the flow” of the body.
40. Stress tape to prevent accidental yanking. Use one or two stress tapings to avoid a direct pull from an IV site if the tubing is snagged. Do not tape down excessive loops or coils which shorten the length of the tubing. One should not tape on the proximal side of a flexing joint; it’ll just be removed easily. Do not wrap the tubing around a digit when taping it because when the patient clenches his fist, it can easily pull out or alter the flow of the catheter. A double-back of the tubing with a short loop will secure it well.

Comments
Post a Comment